Counterbore
This article needs additional citations for verification. (December 2009) |

In machining, a counterbore (symbol: ⌴) is a cylindrical flat-bottomed hole that enlarges another coaxial hole, or the tool used to create that feature. A counterbore hole is typically used when a fastener, such as a socket head cap screw or fillister head screw, is required to sit flush with or below the level of a workpiece's surface.
Whereas a counterbore is a flat-bottomed enlargement of a smaller coaxial hole, a countersink is a conical enlargement of such. A spotface often takes the form of a very shallow counterbore.
As mentioned above, the cutters that produce counterbores are often also called counterbores; sometimes, to avoid ambiguity, the term counterbore cutter is used instead.
The symbol is Unicode character U+2334 ⌴ COUNTERBORE.
Description
[edit]

A counterbore hole is usually used when the head of a fastener, such as a hex head or socket head capscrew, is required to be flush with or below the level of a workpiece's surface.
For a spotface, material is removed from a surface to make it flat and smooth, usually for a fastener or a bearing. Spotfacing is usually required on workpieces that are forged or cast. A tool referred to as a counterbore is typically used to cut the spotface, although an endmill may also be used. Only enough material is removed to make the surface flat.[1]
A counterbore is also used to create a perpendicular surface for a fastener head on a non-perpendicular surface. If this is not feasible then a self-aligning nut may be required.
By comparison, a countersink makes a conical hole and is used to seat a flathead screw.
Standards exist for the sizes of counterbores, especially for fastener head seating areas. These standards can vary between corporations and between standards organizations. For example, in Boeing Design Manual BDM-1327 section 3.5, the nominal diameter of the spotfaced surface is the same as the nominal size of the cutter, and is equal to the flat seat diameter plus twice the fillet radius. This is in contrast to the ASME Y14.5-2009 definition of a spotface, which is equal to the flat seat diameter.
Machining
[edit]
Counterbores are made with standard dimensions for a certain size of screw or are produced in sizes that are not related to any particular screw size. In either case, the tip of the counterbore has a reduced diameter section referred to as the pilot, a feature essential to assuring concentricity between the counterbore and the hole being counterbored. Counterbores matched to specific screw sizes generally have integral pilots that fit the clearance hole diameter associated with a particular screw size (e.g., .191 inches for a number 10 machine screw). Counterbores that are not related to a specific screw size are designed to accept a removable pilot, allowing any given counterbore size to be adapted to a variety of hole sizes. The pilot matters little when running the cutter in a milling setup where rigidity is assured and hole center location is already achieved via X-Y positioning.
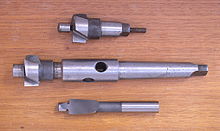
The uppermost counterbore tools shown in the image are the same device. The smaller top item is an insert, the middle shows another three-fluted counterbore insert, assembled in the holder. The shank of this holder is a Morse taper, although there are other machine tapers that are used in the industry. The lower counterbore is designed to fit into a drill chuck, and being smaller, is economical to make as one piece.
See also
[edit]Notes
[edit]- ^ Degarmo, Black & Kohser 2003, p. 606.
References
[edit]- Degarmo, E. Paul; Black, J T.; Kohser, Ronald A. (2003), Materials and Processes in Manufacturing (9th ed.), Wiley, ISBN 0-471-65653-4.
